Support › How to create/edit app Skins and coloring Themes
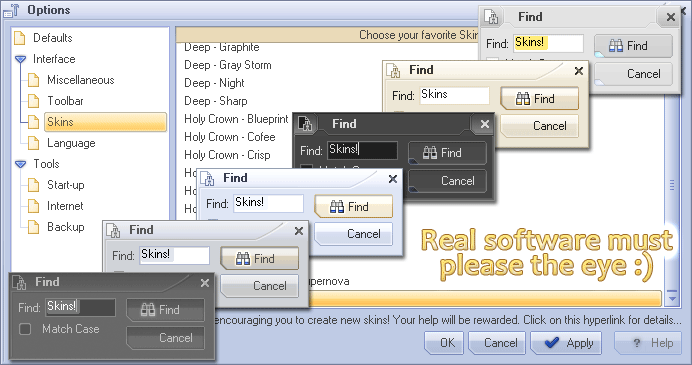
If you have even basic artistic skills, you are welcome to create skins/themes for AllMyNotes Organizer, please read below the details how to create skins. We are even offering Deluxe Edition license for AllMyNotes Organizer to encourage new skins creation under following two conditions:
1. The skin or theme, or small element of it looks good enough to be either distributed with the application, or published on our web-site, or, at least, if we'll find some elements of it worthy to be included in other skins;
2. Provide us with source file of your graphics (.psd file), we need it as we frequently add graphical elements and new icons, without this file we'll be unable to maintain the Skin.
--- How to do Skins for AllMyNotes Organizer (draft guideline) ---
Skin files are located under c:\Program Files\AllMyNotes Organizer\Skins\folder. Currently you can find there two skins - Holy Crown, and Deep. Each of them is located in separate folder.
Each folder contains two files:
1. SkinInfo.ini - it contains all colors and metrics of the skin.
2. .png file of graphical skin elements. Coordinates of controls in this bitmap are saved in SkinInfo.ini
To create new skin:
1. Copy one of existing skins to another folder
2. In copied file rename skin name in SkinInfo.ini - see FileDescription entry, it would be nice to keep folder name, and skin name the same. That's pretty much it, since this point, you can either change colors, or paint a bitmap, whatever.
Other Tips:
1. Usually, we are doing skins using PhotoShop in .psd file format, it allows to apply powerful effects and benefit from lawyer effects and transparency. And after skin bitmap editing is done, we export data to skin .png file. Work exclusively with .png files is strongly not recommended, it's exhausting for an artisan and non-extendable for future expansion.
2. Please feel free to contact us at Vladonai Software for resources, we can provide you graphics we already used for skins, and possible some more tips and experience.
Content of bitmap and SkinInfo.ini is self-explanatory, entry names are well named, and on bitmap we've added labels to simplify creation of new skins. You might need information on icons meaning in toolbars, menus, buttons, tree, in this case please contact us, we'll gladly provide you with details and other resources.
P.S. Here is a quick visual example, how image corrdinates are reflected in SkinInfo.ini file:
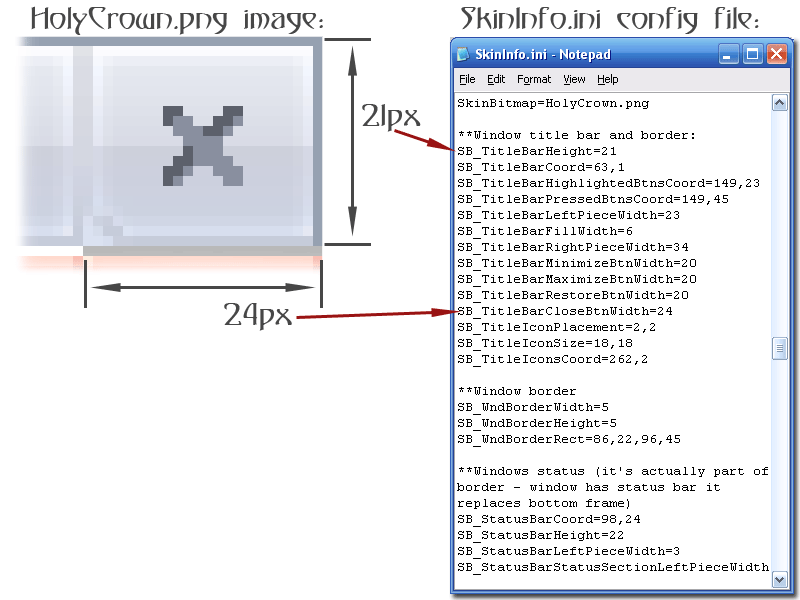
Anatomy of SkinInfo.ini
SkinInfo.ini is a plain text file of Name=Value lines, grouped into sections: skin information, color themes, colors, text editor, dimensions, fonts and the bitmap map (all the SB_* entries). Lines starting with ** or // are comments - a handy place to park an old value instead of deleting it. Colors can be written as #RRGGBB (copy it straight from Photoshop) or as R,G,B - #FFFFFF and 255,255,255 are the same white.
Leave ProjectSignature and RequiredAppBuildNumber alone: they tell the app that this is an AllMyNotes skin and which build it needs. Change FileDescription - that is the skin name the menu shows.
Color themes: one skin, twenty moods
A skin is not just one look. Every ThemeEffects_N line is a recipe: when the theme is loaded, the app takes the skin bitmap and runs it through a chain of image filters, left to right, before painting anything. The .png on the disk never changes. That is how Holy Crown ships Sepia, Gold, Coffee, Blueprint and Night Vision from a single picture - one bitmap, no extra painting, and Photoshop never even knew.
The format: the theme name in double quotes, then the effects separated by |. ThemeEffects_Default (no name) is applied to the skin itself. Number the themes 1, 2, 3... without gaps - the app reads them until the first missing number, so a theme placed after a gap silently does not exist. ThemeEffectsM3_N lines work the same way and need AllMyNotes 3 or newer. Color themes are a Deluxe edition feature.
From white to black in one line
Want a dark version of a light skin? You do not need to repaint a single pixel. INVERTBRIGHTNESS turns light into dark but keeps the hues, so blue stays blue, it just goes to night shift. A plain INVERT would also turn your blues orange - fun for a minute, then your eyes file a complaint. Add SCALELUMA to keep the result from going pitch black, and a bit of GRAYSCALE to calm down the colors that suddenly start glowing in the dark:
Holy Crown's own "Night Vision Glow" and "Night Vision Gray" themes are built exactly like this. Do not forget the text colors: the filters repaint the bitmap, while the colors in the Colors section stay as written - a dark gray FontColor on a now-dark background is a very elegant way to hide your notes from yourself.
The effects you can chain
| Effect | What it does |
|---|---|
| AUTOLEVELS | Stretches the brightness range to the full 0-255. The "make it look less washed out" button. |
| GRAYSCALE | Takes the color away; GRAYSCALE40 takes away only 40%. Instant serious-business mode. |
| SEPIA | Old photo tones. Your notes from yesterday suddenly look like they were written in 1890. |
| INVERT, INVERTBRIGHTNESS | INVERT flips every color (negative film), INVERTBRIGHTNESS flips only light and dark - the right one for dark themes. |
| BLUEPRINTLIGHT, BLUEPRINTDARK | BLUEPRINTLIGHT / BLUEPRINTDARK - the engineer's drawing look. Notes that feel like they could build a bridge. |
| ADJUSTLEVELS | ADJUSTLEVELS:min,max,midSrc,midDst (0-255) - moves the midtones: 0,255,150,110 makes the middle darker, 0,255,150,190 lighter. |
| BRIGHTNESSCONTRAST | BRIGHTNESSCONTRAST:b,c (-255..255, 0 = no change). Exactly what it says on the tin. |
| HUESATURATIONLIGHTNESS | HUESATURATIONLIGHTNESS:h,s,l - hue shift -360..360, saturation and lightness in percent. Spin the hue by 180 and the whole skin moves to the opposite side of the color wheel. |
| REPLACECOLOR | REPLACECOLOR:#from,#to,fuzziness - swaps one color for another; fuzziness 0..180 says how "similar" counts. Holy Crown's Gold, Coffee, Pink and Sea themes are all this one trick with a different #to. |
| SCALELUMA | SCALELUMA:min,max (0-1000) - squeezes brightness into a range: 250,950 = crisper, 0,500 = everything at most half bright, the night owl's choice. |
| SCALESATURATION | SCALESATURATION:min,max (0-1000) - the same for saturation: raise the minimum and pale colors get some backbone. |
The main elements, and what happens when you poke them
A few entries from Holy Crown, what they control, and what to expect when you change them:
| Entry | What changes (and the side effects) |
|---|---|
| WindowBackgroundColor=#DAE1F0 | The canvas behind all panels. Change it and the whole app changes its mood, like a room with new wallpaper. |
| FontColor=#636363 | The main text color. Set it equal to ViewBackgroundColor and you have invented invisible ink - excellent for secrets, poor for productivity. |
| MenuFontColor=#6080BD MenuSelectionColor=#a9beef MenuBackgroundColor=#FAFAFA | Menu text, the selection bar under the mouse and the menu background. Make the selection a loud color and every menu trip becomes a small disco. |
| TextEditorSelectionColor=#f6d595 TextEditorInactiveSelectionColor=#f8ebd3 | The highlighter you drag over text in a note (the inactive one is for when the editor does not have focus). Pick a dark one and selected text becomes unreadable exactly when you want to copy it. |
| TreeOutlineColorHighlighted=#D0BF91 | The rounded outline around the selected folder in the tree. The subtle "you are here" sign. |
| DistBetweenControls=4 DistBetweenCtlAndBorder=5 | Gaps between panels and from panels to the window border, in pixels. 4 is cozy; 40 and the panels drift apart like continents. |
| FontNormalName=Amelian.TTF FontMenuName=segoepr.ttf FontEditName=TENAHB48.TTF FontWndTitleName=Orbitbn.ttf FontWndTitleBolded=TRUE FontHintName=Amelian.TTF | A skin can bring its own fonts for five places: normal UI text (FontNormal), menus (FontMenu), the note editor (FontEdit), window titles (FontWndTitle, plus FontWndTitleBolded=TRUE) and tooltips (FontHint). Without these entries the system font is used. The .ttf file is taken from the skin folder, or from the Windows Fonts folder (that is where Segoe Print, segoepr.ttf, comes from). Segoe Print on the menu looks charming for exactly one day; Orbitbn.ttf in the window title makes the app feel like a spaceship console a bit longer. The ...Size entries still work, but the text size is now much easier to change in the app's own settings - so let the skin choose the font face and leave the size to the user. |
| SkinBitmap=HolyCrown.png SB_Button_NormalCoord=69,108 SB_Button_LeftPieceWidth=10 SB_ScrollBarWidth=16 | Everything with an SB_ prefix points into the .png: Coord is the x,y of the element's top-left pixel, the LeftPiece / Fill / RightPiece widths tell how it is cut - the corners are drawn as they are and the fill piece is stretched. Change a size here without moving the pixels in the .png and the app cuts the picture in the wrong places - your skin enters its Picasso period. |
Seeing your changes in the app, fast
AllMyNotes reads SkinInfo.ini and the .png at two moments only: when it starts, and when you choose a skin or a theme in the Skins menu. Saving the file does nothing on its own. No need to restart the app after every tweak, though:
1. Edit SkinInfo.ini (or export the .png) and save it.
2. In the Skins menu pick any other skin or theme, then pick yours again. Every pick re-reads the files from the disk, so the second click shows your changes - about a second per round trip.
Picking the skin that is already checked does nothing at all - the app politely decides there is nothing to change. Always go "away and back".
The list of skins in the menu is built once per session, so after you add a new skin folder or rename the skin (FileDescription) or a theme, restart AllMyNotes once to see the new name. And if your skin suddenly looks exactly like Holy Crown: the app could not load your file and fell back to the default skin - check the last line you changed.
Tip: the Skins folder is under Program Files, so Windows may refuse to save there. Run your editor as administrator, or work in the portable version where the skins are in an ordinary folder.
Note: Lite edition is limited to 2 skins only, whereas Deluxe has more themes.
Have fun! :-)